Showing posts with label birthday card. Show all posts

Saturday, August 12, 2023

EARTHEN TEXTURES JULY 2023 PLAY DAY BIRTHDAY CARD

 Hi, Friends,

Today I am sharing the last card from our July 2023 Play Day.  It uses the stamp set Earthen Textures, along with the Earthen Textures dies. 

MY RECIPE:

     STAMPS:  Earthen Textures, Something Fancy

     CARDSTOCK:

          Misty Moonlight:  5-1/2 x 8-1/2, scored at 4-1/4

          Earthen Elegance DSP:  4-1/8 x 5-3/8

          Crumb Cake:  2-15/16 X 4-7/16

          Earthen Elegance DSP:  2-13/16 x 4-5/16

               SCRAPS:  Pebbled Path, Early Espresso, Crumb Cake, Pecan Pie

               INSIDE:  

                    Crumb Cake:  3-3/4 X 5

                    Very Vanilla:  3-5/8 x 4-7/8

     INK:  Misty Moonlight, Pecan Pie, Early Espresso

     DIES:  Earthen Textures Dies, Sending Dies

     MISCELLANEOUS:  SU Die Cut Machine, Rustic Metallic Dies, Dimensionals

Here is what the inside of the card looks like:


Simple, yet elegant!

HOW I MADE IT:

1.  Use Misty Moonlight ink to stamp signature stamp on back of card base.

2.  Stamp leaves using Misty Moonlight ink on lower right corner of inside panel.

3.  Adhere inside panels together; adhere to inside of card base.

4.  Adhere Earthen Elegance DSP to front of card base.

5.  Adhere Earthen Elegance DSP to Crumb Cake Cardstock; adhere to center front of card base.

6.  Adhere Pebbled Path leaf die cut to front of card base.

7.  Adhere Early Espresso leaves to front of card base.

8.  Adhere Crumb Cake leaves to front of card base.

9.  Use Pecan Pie ink to stamp vase on Pecan Pie Cardstock.  Cut out using die and SU Die Cut Machine.  Attach to front of card base using dimensionals.

10.  Stamp sentiment using Early Espresso ink on scrap of Crumb Cake Cardstock.  Cut out using die and SU Die Cut Machine.  Cut off ends of die cut.  Attach to front of card base using adhesive (right side) and dimensionals (left side).

11.  Add Rustic Metallic Dots (see sample for placement).


Thanks for stopping by today!

Happy stamping,

Linda


Thursday, June 22, 2023

ZANY ZOO MAY 2023 PLAY DAY PROJECT

 Hello, Crafty Friends,

Today I am sharing the third project we made at May Play Day.  We used the Zany Zoo stamp set along with the Zoo Crew DSP.  One side of the Zoo Crew DSP has the whimsical drawings of animals, which are cute, but the flip side is all black and white prints, which are very, very versitle!  


MY RECIPE:

     STAMPS:  Zany Zoo, Best Family Ever

     CARDSTOCK:

          Gray Granite:  5-1/2 x 8-1/2 scored at 4-1/4

          Basic Black:  4 x 5-1/4

          Zoo Crew DSP:  3-7/8 x 3-7/8

          Zoo Crew DSP:  1-1/2 x 3-7/8

          Basic Black:  3/8 x 3-7/8

          SCRAPS:  Basic White, Gray Granite, Basic Black

          INSIDE:

               Basic Black:  3-3/4 x 5

               Basic White:  3-5/8 x 4-7/8

     INK:  Early Espresso

     BLENDS:  Gray Granite, Real Red (D), Flirty Flamingo (D), Daffodil Delight (D), Pumpkin Pie (D)

     DIES:  Radiating Stitches Dies, Cracker and Treat Box Dies

     MISCELLANEOUS:  SU Die Cut Machine, Baker’s Twine Essentials Pack, Rhinestones, Dimensionals


I kept the inside of the card simple (maybe except that there is a bit of coloring).  We stamped the sweet little raccoon on the lower right corner and colored him in.  

HOW WE MADE IT:

1.  Use Early Espresso ink to stamp signature stamp on back of card base.

2.  Stamp raccoon stamp on lower right corner of inside panel using Early Espresso ink.  Color using markers.

3.  Adhere inside panels together; adhere to inside of card base.

4.  Adhere patterned paper to Basic Black Cardstock; adhere strip of Basic Black Cardstock to seam of patterned paper.

5.  Tie Baker’s Twine around strip of Basic Black Cardstock.

6.  Adhere panel to front of card base.

7.  Stamp raccoon on scrap of Basic White Cardstock.  Cut out using die and SU Die Cut Machine.  Color using markers.

8.  Adhere stamped image to Basic Black die cut panel.

9.  Attach die cut panel to front of card base using dimensionals.

10.  Stamp sentiment on scrap of Gray Granite Cardstock.  Cut out using die and SU Die Cut Machine.

11.  Add Rhinestones (see sample for placement).


I love the way this card turned out—black and white with a pop of color is always a good choice!

Thanks for stopping by today!

Happy stamping,

Linda

Wednesday, June 21, 2023

CHEERFUL DAISIES BIRTHDAY CARD

 Hi, Friends,

Today I am sharing another card from May Play Day.  It uses the Cheerful Daisies stamp set and dies and the beautiful Fresh as a Daisy DSP.  It may not show up in the picture, but we used Wink of Stella on the daisies to make them sparkle!


MY RECIPE:

     STAMPS:  Cheerful Daisies, Zany Zoo (sentiment)

     CARDSTOCK:

          Crumb Cake:  5-1/2 x 8-1/2 scored at 4-1/4

          Crushed Curry:  3-1/2 x 4-3/4

          Fresh as a Daisy DSP:  3 x 4-1/2 (cut into three 1 x 4-1/2 strips)

          SCRAPS:  Basic White, Crushed Curry

     INSIDE:

          Garden Green:  3-3/4 x 5

          Basic White:  3-5/8 x 4-7/8

     INK:  Crushed Curry, Garden Green, Gray Granite

     BLENDS:  Daffodil Delight (D)

     DIES:  Cheerful Daisies Dies

     MISCELLANEOUS:  SU Die Cut Machine, Dimensionals, Rhinestones, Wink of Stella

The large daisy is die cut and popped up using dimensionals.  I feel like the Queen of Dimensionals, since I rarely make a card without them!

The inside of the card looks like this:


We simply stamped a small daisy on the lower right corner, colored the center and used Wink of Stella on the daisy petals.

HOW WE MADE IT:

1.  Use Garden Green ink to stamp signature stamp on back of card base.

2.  Stamp daisy petals using Gray Granite ink on lower right corner of inside panel.  Use Crushed Curry ink to stamp flower center, then fill in by coloring with Daffodil Delight Blend marker.

3.  Adhere inside panels together; adhere to inside of card base.

4.  Adhere three strips of patterned paper to Crushed Curry Cardstock.  The patterned paper lines up, so look at it carefully before adhering it down.

5.  Adhere Crushed Curry Cardstock strip about one inch from bottom of panel.

6.  Use Garden Green ink to stamp sentiment on scrap of Crushed Curry Cardstock.  Cut out using die and SU Die Cut Machine, making sure that the sentiment is to the right of the die cut.

7.  Adhere sentiment die cut on right side of Crushed Curry strip.  

8.  Stamp large daisy using Gray Granite ink on scrap of Basic White Cardstock.  Cut out using die and SU Die Cut Machine.  Color petals using Wink of Stella.

9.  Use Crushed Curry ink to stamp center of daisy on scrap of Basic White Cardstock.  Color in using Daffodil Delight Blend marker.  Fussy cut and adhere to center of daisy.

10.  Stamp two leaves using Garden Green ink on scrap of Basic White Cardstock.  Fussy cut and adhere to card base (see sample and lay daisy die cut down to determine placement).

11.  Attach large daisy to front of card base using dimensionals.

12.  Add rhinestones (see sample for placement).


Thanks for stopping by today to see some of my crafty projects!  

Happy stamping,

Linda

Tuesday, June 20, 2023

CIRCLE SAYINGS BIRTHDAY CARD!

 Hi, Friends,

Today I am sharing a project we made at our May, 2023 Play Day.  I LOVE, LOVE, LOVE this Countryside Inn Designer’s Series Paper.  When I saw it in the new catalog for the first time, I knew that I wanted to use it a lot.  I feel like this card was an awesome design to showcase all the beautiful papers in the package.  The layout I used was from the Control Freaks Sketch Challenge, April 2023.


MY RECIPE:

     CARDSTOCK:

          Crumb Cake:  5-1/2 x 8-1/2 scored at 4-1/4

          Night of Navy 4 x 5-1/4

          Countryside Inn DSP:  2 x 5

          Countryside Inn DSP:  1-5/8 x 2

          Countryside Inn DSP:  3/4 x 1-5/8

          Countryside Inn DSP:  1-5/8 x 2

     SCRAPS:  Boho Blue, Basic White

     INSIDE:

          Night of Navy:  3-3/4 x 5

          Basic White:  3-5/8 x 4-7/8

     INK:  Night of Navy

     BLENDS:  Crumb Cake, Balmy Blue (L)

     DIES:  Stylish Shapes Dies

     MISCELLANEOUS:  SU Die Cut Machine, Dimensionals, Rhinestones


On the inside, we simply stamped the sentiment and adhered the Cardstock together.  Simple, but it works!  

HOW WE MADE IT:

1.  Use Night of Navy ink to stamp signature stamp on back of card base.
2.  Stamp sentiment using Night of Navy ink centered toward the top of the inside panel.
3.  Adhere inside panels together; adhere to inside of card base.
4.  Lay patterned paper pieces on Night of Navy Cardstock until you like the placement.  Adhere patterned paper pieces in place on the Night of Navy Cardstock.
5.  Adhere patterned paper/Night of Navy Cardstock panel to front of card base.
6.  Use Night of Navy ink to stamp the “celebrate” circle on scrap of Basic White Cardstock.  Cut out using die and SU Die Cut Machine.
7.  Stamp cupcake using Night of Navy ink in center of “celebrate” circle.  Color using markers.
8.  Adhere cupcake circle to Boho Blue circle die cut.  Attach to card front using dimensionals.
9.  Add rhinestones (see sample for placement).


We added Rhinestones where the dots are on the “celebrate” circle—you know we have to have a little bit of bling!

Hope you like today’s project!  Thanks for stopping by!

Happy stamping,
Linda

Thursday, October 7, 2021

GARDEN BIRDHOUSES—OCTOBER 2021 PLAY DAY PROJECT ONE!

 Hi, Friends,

Just wanted to stop by today and share with you one of the projects we made at Play Day last Saturday.


This project was CASED from Tracy Bradley, stampingwithtracy.com, post dated July 20, 2021.  I was quite busy the week before Play Day, and often look to other’s projects to at least give me a starting point for a project when I am a bit overwhelmed.

MY RECIPE:

     STAMPS:  Garden Birdhouses

     CARDSTOCK:
          Crumb Cake:  5-1/2 x 8-1/2, scored at 4-1/4
          Balmy Blue:  4 x 5-1/4
          Sweet Symetry DSP:  3-7/8 x 5-1/8
               SCRAPS:  Basic White, Balmy Blue, Crumb Cake
          INSIDE:
               Misty Moonlight:  3-3/4 x 5
               Basic White:  3-5/8 x 4-7/8

     INK:  Early Espresso

     BLENDS:  Misty Moonlight (L), Balmy Blue (D), Mossy Meadow (L), Crumb Cake (D)

     ACCESSORIES:  Ornate Frames Dies, Stitched Rectangles Dies, SU Die Cut Machine, Linen Thread, Metallic Pearls, Dimensionals


I like using the Garden Birdhouse Stamp Set because it is so versatile—can be either masculine or feminine, and can be used for LOTS of occasions—just change the sentiment to one that is appropriate.


HOW I MADE IT:

1.  Use Early Espresso ink to stamp signature stamp on back of card base.

2.  Stamp branch and bird on lower right corner of inside panel using Early Espresso ink.  Color using markers.

3.  Use Early Espresso ink to stamp sentiment toward top center of inside panel.

4.  Adhere inside panels together; adhere to inside of card base.

5.  Adhere patterned paper to Balmy Blue cardstock.  Wrap linen thread around panel about 1-1/4” from bottom; tie in a knot.

6.  Adhere above panel to front of card base.  

7.  Stamp branch, birdhouse and bird on scrap of Basic White cardstock, using Early Espresso ink.  Cut out using die and SU Die Cut Machine.  Color using markers.

8.  Adhere stamped image to Balmy Blue die cut.

9.  Attach focal image panel to front of card base, using dimensionals.

10.  Stamp sentiment using Early Espresso ink on scrap of Crumb Cake cardstock.  Cut out using die and SU Die Cut Machine.

11.  Attach sentiment to card front using adhesive (on left side) and dimensional (on right side).

12.  Add metallic pearls; see sample for placement.


Thanks so much for stopping by today!  I appreciate each of you!


Happy stamping,
Linda


Wednesday, September 22, 2021

PARTY PUFFINS FUN FOLD CARD!

 Hi, Friends,

I am currently at the Salvation Army Blessings Crop and enjoying connecting with new and old friends and doing some crafting!  But I wanted to share the third (and final) card from our last Play Day.


We used the Party Puffin stamp set to make the project.  

MY RECIPE:

     STAMP SET:  Party Puffins

     CARDSTOCK:
          Bermuda Bay:  4-14 x 11, scored at 5-1/2 and 6-3/4
          Granny Apple Green:  4 x 4
          Patterned Party DSP (host):  3-7/8 x 3-7/8
          Granny Apple Green:  1 x 4
          Pattern party DSP (host):  7/8 x 3-7/8
               SCRAPS:  Basic White, Poppy Parade
               INSIDE:
                    Granny Apple Green:  4 x 4
                     Basic White:  3-7/8 x 3-7/8

     INK:  Memento Black

     BLENDS:
           Poppy Parade (D), Pumpkin Pie, Granny Apple Green (D), Daffodil Delight (D), Smoky Slate (L)

     ACCESSORIES:
           Layering Circles Dies, SU Die Cut Machine, Baker’s Twine Essentials Pack, Rhinestones, Dimensionals


HOW I MADE IT:

1.  Use Memento black ink to stamp signature stamp on back of card base.

2.  Adhere striped paper to Granny Apple Green Cardstock.  Adhere to left side of front of card base.

3.  Tie white twine around striped strip.

4.  Adhere small section of card base together.

5.  Stamp sentiment on top left of inside panel using Memento black ink.

6.  Use Memento black ink to stamp cake on lower right corner of inside panel.  Color using markers.

7.  Adhere inside panels together; adhere to inside of card base.

8.  Adhere heart paper to Granny Apple Green Cardstock.  Adhere to right front of card base.

9.  Stamp puffin using Memento black ink on scrap of Basic White Cardstock.  Cut out using die and SU Die Cut machine.

10.  Adhere stamped image to Poppy Parade scalloped circle.

11..  Attach circle to card front using dimensionals.

12.  Add rhinestones (see sample for placement).

Picture of the inside:


I hope you enjoyed this fun fold project.  

Have an amazing day—hope it is one with time to craft!


Happy stamping,
Linda


Tuesday, February 23, 2021

DARLING DONKEYS BIRTHDAY CARD!

 Hi, Friends,

It has been an interesting week so far.  Yesterday, Doyle and I were able to get our first COVID vaccines!  We are excited!  And they have FUN bandaids!  It was the very first time I have ever been congratulated on getting a shot!


Just wanted to share another project with you today.  This one uses the Darling Donkeys stamp set, which is one of the products you can get free with a $50 purchase for just another few days (through the end of February).  The Oh So Ombre DSP that I used is also a Sale-a-bration product, free with a $50 purchase.


MY RECIPE:

     STAMPS:  Darling Donkeys

     CARDSTOCK: 
          Smoky Slate:  5-1/2 x 8-1/2, scored at 4-1/4
          Rococo Rose:  3-3/4 x 5
          Basic White:  3-1/2 x 4-3/4
          Oh So Ombre DSP:  3-1/4 x 4-1/2
               INSIDE:
                    Rococo Rose:  3-3/4 x 5
                    Basic White:  3-5/8 x 4-7/8
               SCRAPS:  Basic White, Smoky Slate

     INK:  Basic Gray

     BLENDS:  Rococo Rose, Granny Apple Green, Petal Pink

     ACCESSORIES:  Stitched Rectangle Dies, SU Die Cut Machine, Rhinestones, Dimensionals


I fussy cut the donkey; it took a couple of minutes, but since I wasn't making 10 or 12, it wasn't that bad!


HOW I MADE IT:

1.  Use Basic Gray ink to stamp signature stamp on back of card base.

2.  Stamp donkey stamp on lower right corner of inside panel using Basic Gray ink.  Color the rose using Blends markers.  Adhere inside panels together; adhere to inside of card base.

3.  Adhere the Oh So Ombre DSP to the center of the Rococo Rose cardstock.  

4.  Use the Stitched Rectangle Dies and Stampin' Up! Die Cut Machine to cut window from the Basic White cardstock.  Adhere Basic White window over Oh So Ombre DSP on Rococo Rose cardstock.  Adhere panel to front of card base.

5.  Use Basic Gray ink to stamp donkey on scrap of Basic White cardstock.  Cut out using paper snips.  Adhere donkey to left side of Basic White window.

6.  Stamp sentiment on scrap of Smoky Slate cardstock using Basic Gray ink.  Cut out using Stitched Rectangle Dies and Stampin' Up! Die Cut Machine.  Attach to front of card stock using dimensionals (see sample for placement).  

7.  Add rhinestones to sentiment panel (see sample for placement).


Hope you have enjoyed today's project!  I have been creating a bit more lately, so plan to post another project very soon!

Have an awesome, creative day!

Happy stamping,
Linda

Wednesday, August 19, 2020

PEACEFUL MOMENTS PRIZED PEONY

Hi, Friends,

I really meant to have this post up several days ago, and I got busy and distracted and didn't get it done.  Anyway, here is my card, even if it is late!


If you follow my blog, you will remember I used this layout with the Ornate Style cards, and the die for the side die cut is from the Ornate Layers dies.  But this flower just seemed to fit so well with this layout that I had to use it.  And I really LOVE the way this turned out!

RECIPE FOR THE CARD:

STAMPS:  Prized Peony, Peaceful Moments

CARDSTOCK:
     Gray Granite:  4-1/5 x 11, scored at 5-1/2
     Gray Granite:  4-1/8 x 5-3/8
     Basic Gray:  4 x 4
     Whisper White:  3-7/8 x 3-7/8
          SCRAPS:  Whisper White, Gray Granite, Basic Gray
               INSIDE:
                    Basic Gray:  3-3/4 x 5
                    Whisper White:  3-5/8 x 4-7/8

INK:  Gray Granite, Basic Gray

BLENDS:  Petal Pink, Old Olive (L), Daffodil Delight (D)

ACCESSORIES:  Peony Dies, Ornate Layers Dies, Magnetic Platform, Subtles Embossing Folder, Elegant Faceted Gems, Dimensionals


HOW I MADE IT:

1.  Using scoreboard, score card base at 5-1/2.  Fold card base and burnish with bone folder to make a sharp crease.

2.  Use Gray Granite ink to stamp signature stamp on back of card base.

3.  Stamp small flower on lower right corner of inside panel using Gray Granite ink.  Color using markers.

4.  Adhere inside panels together; adhere to inside of card base.

5.  Emboss Gray Granite cardstock using Subtles Embossing Folder and Big Shot.  Adhere to front of card base.

6.  Use Gray Granite ink to stamp sentiment on lower right corner of front panel.  Stamp background decorative stamp using Gray Granite ink three times on front panel.  See sample for placement.

7.  Adhere stamped panel to Basic Gray cardstock.  Adhere to front of card base.

8.  Use Ornate Layers Dies and Big Shot to die cut Gray Granite cardstock and Basic Gray cardstock panels.  Adhere the "ornate" Gray Granite layer to the Basic Gray layer.  Adhere to front of card base.

9.  Stamp large flower on scrap of Whisper White cardstock using Gray Granite ink.  Color using markers.  Cut out using Peony Dies and Big Shot.  Adhere to front of card base using dimensionals.

10.  Add Elegant Faceted Gems.  See sample for placement.

The inside of the card looks like this:


I like to decorate the inside of the card and stamp and color something on it.


I hope you enjoyed this project; it took me several days to get this posted--Doyle and I have been doing some small projects around the house and I have been distracted!  Hopefully I will have another project to share with you soon.  I have two more Peony cards completed and will be sharing those soon!

Take some time to do something creative today!

Happy stamping,
Linda

Friday, May 8, 2020

Outdoor Barbeque, Take Two!

Hi, Friends,
Today is my son-in-law’s birthday, and I know he already has his card, so I can post it now!


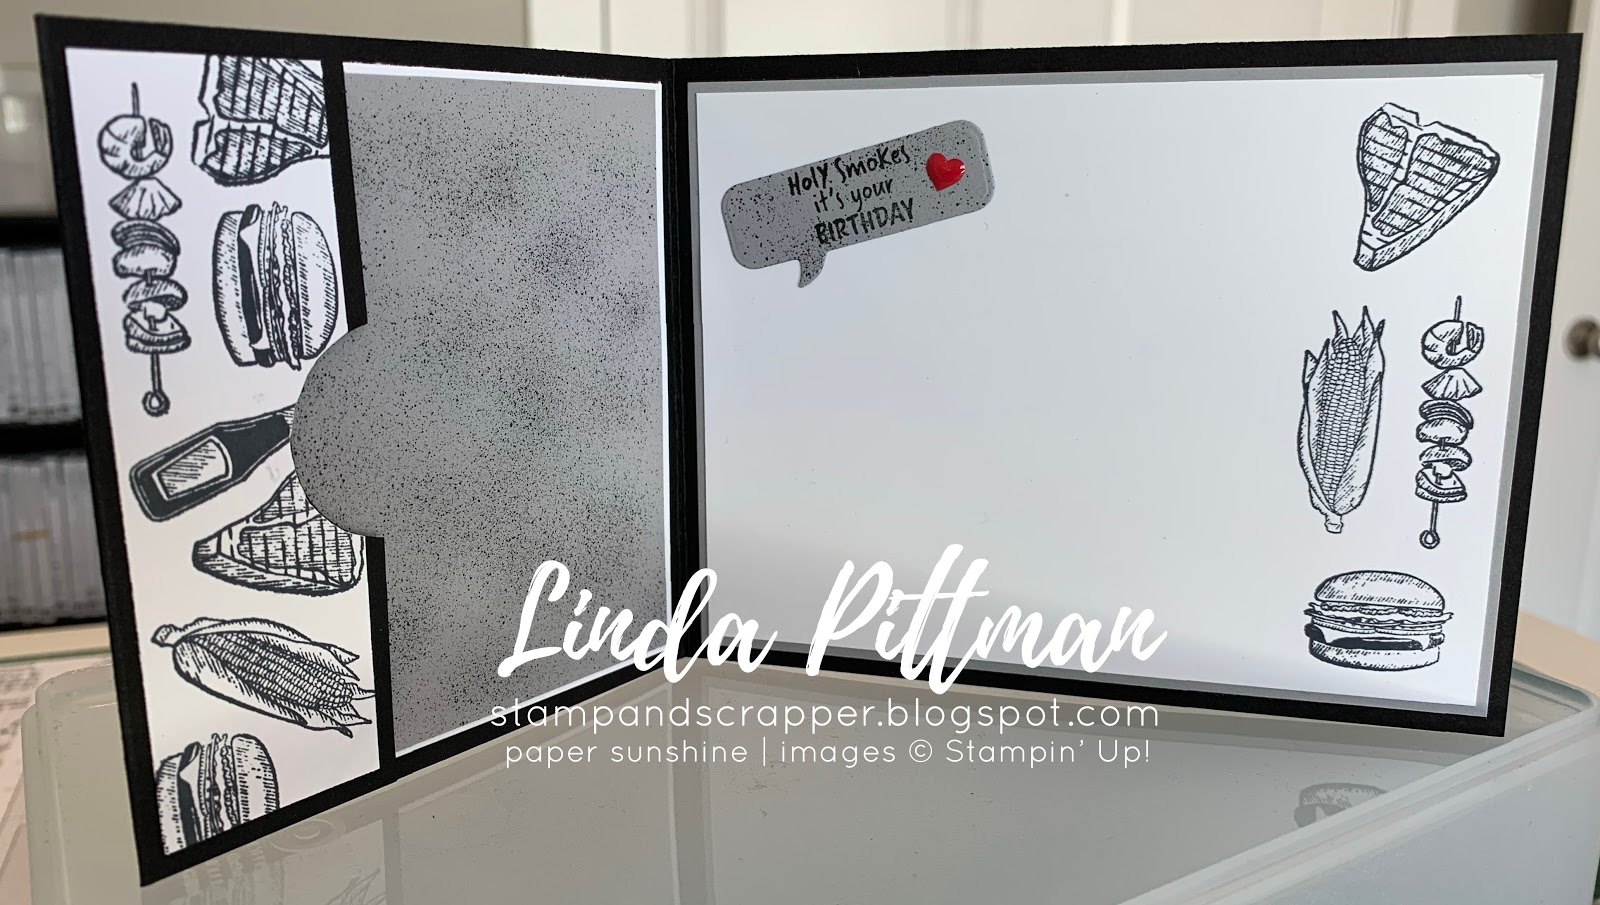
The card is a gift card holder.  The inside looks like this:


and a picture of the project laying flat:


I don't have complete directions for this one, I only made one of them, and didn't measure it before I sent it.  The basic card is 4-1/4 x 11, scored at 1-1/2 and 5-1/2.  I used Memento Black ink, Basic Black cardstock, Whisper White cardstock, and Smoky Slate cardstock.  I used the Stitched Shapes dies, Special Days dies, and Layering Squares Dies, the Big Shot, Magnetic Platform.  I used the spritzer (retired) again.  

I hope you guys have enjoyed this project.  Thanks for stopping by!

Happy stamping,
Linda


Friday, April 3, 2020

Outdoor Barbecue Birthday

Hi, Friends,

It is such a beautiful day outside today!  Doyle and I walked twice today in our neighborhood and ate dinner on the back porch tonight—the closest thing we can get to “eating out” right now.  Our son had a birthday yesterday, so I thought I would share the card I made for him with you.

He bought a new grill last summer, so I couldn't resist using this set to make his card this year.  I used a bit of retired product on this card, but you could easily make it substituting current stuff.  I used the Black Baker's Twine around the front of the card which is retired and also a Metallic Enamel Shape where the temperature gauge would be.  I also used the old trusty "spritzer" with a Black Stampin' Write marker (the one most of you hated when I used it on a Play Day project--remember?) to spritz the Smoky Slate cardstock on the front of the card to make it look smokey, and a Real Red heart from the Brights Enamel Shapes--all of those were retired!


The inside looked like this:


I stamped the images using the Memento Black ink on a Whisper White cardstock panel and didn't color them.  I thought it turned out pretty good, and my son was pleased!

Here is my recipe for this card:

 STAMPS:  Outdoor Barbecue

CARDSTOCK:
     Basic Black:  5-1/2 x 8-1/2, scored at 4-1/4
     Whisper White:  4 x 5-1/4
     Smoky Slate:  3-7/8 x 5-1/8
     SCRAPS:  Whisper White, Basic Black
     INSIDE:
          Smoky Slate:  3-3/4 x 5
          Whisper White:  3-5/8 x 4-7/8

INK:  Memento Black, Real Red

BLENDS:  Smoky Slate

ACCESSORIES:  Stitched Shapes Dies, Layering Squares Dies, Special Days Dies, Magnetic Platform, Big Shot, Black Baker's Twine (retired), Brights Enamel Shapes (retired), Metallic Enamel Shapes (retired), Stampin' Spritzer (retired), Dimensionals, Black Stampin' Write Marker

HOW I MADE IT:
1.  Use Scoreboard to score card base at 4-1/4.  Fold card base and burnish with bone folder.
2.  Use Memento Black ink to stamp hamburger, catsup, kabab and corn on the cob along the right side of the inside panel.  
3.  Adhere stamped panel to Smoky Slate Cardstock; adhere to inside of card base.
4.  Place Black Stampin' Write Marker in Stampin' Spritzer; spritz the Smoky Slate cardstock.
5.  Adhere spritzed cardstock to Whisper White Cardstock.  Wrap and tie Black Baker's Twine around the middle of the panel.  Adhere to front of card base.
6.  Stamp grill using Memento Black ink onto scrap of Whisper White Cardstock.  Cut out using Stitched Shapes Dies and Big Shot.  Color using Smoky Slate Blend Marker.
7.  Cut out scalloped square from Basic Black Cardstock using Layering Squares Dies and Big Shot. 
8.  Adhere grill square to Basic Black scalloped square.
9.  Attach grill square to front of card base using dimensionals.  Attach Metallic Enamel Shape.
10.  Use Real Red ink to stamp flame on scrap of Whisper White cardstock.  Fussy cut (use scissors to cut out) and adhere just above the grill (see sample for placement).  
11.  Stamp sentiment using Memento Black ink.  Cut out using Special Days Dies and Big Shot.  Adhere to card front just above grill square.  Add heart from Brights Enamel Shapes.

The OUTDOOR BARBECUE stamp set also has sentiments for Father's Day and a You're Invited to make invitations for a BBQ, which makes it versatile!  The stamp set is in the January - June Mini Catalog.  

Thanks for stopping by today!  I hope that you are using this time of "staying in place" to craft.  Make someone's day by making them and card and dropping it in the mail tomorrow!  

Happy stamping,
Linda

Sunday, March 15, 2020

CASED Grace’s Garden MARCH 2020 Play Day

Hi, Friends,
It has been a long process, but I finally was able to hold a Saturday Play Day last Saturday.  Moving is definitely not for the faint of heart and getting my craft room set up has been slow.  I am still moving things around.  But the good news is that I am making progress and every day gets a tiny bit more organized.  I hope to post a picture of my craft room (at least as it is now) soon!  I really do love working in it!

One of my favorite sets in the January - June Mini Catalog is the Grace’s Garden Stamp Set, so I decided to use it for March Play Day.  I found a card on Pinterest that I fell in love with and pretty much straight CASED it with only a few changes.  You can find the card I CASED by Kerry Bunting, kbpapercraft.blogspot.com, post dated January 3, 2020.  Here is a picture of my project:


and the inside looks like this:


Here is my recipe for the card:

STAMPS:  Grace's Garden, Label Me Bold

CARDSTOCK:  
     Highland Heather:  5-1/2 x 8-1/2 scored at 4-1/4
     Highland Heather:  4-1/8 x 5-3/8
     Whisper White:  3-1/8 x 4-1/2
     Subtles 6 x 6 DSP:  3-1/2 x 4-3/4
          SCRAPS:  Whisper White
          INSIDE:  
               Whisper White:  3-3/4 x 5

INK:  Memento Black

BLENDS:  Highland Heather (Light), Old Olive (Light), Petal Pink (Dark), Daffodil Delight (Dark)

ACCESSORIES:  Subtles Embossing Folder, Stitched Rectangle Dies, Stitched So Sweetly Dies, Garden Gateway Dies, Magnetic Platform, Big Shot, Linen Thread, Dimensionals, Rhinestones

HOW I MADE IT:
1.  Score card base at 4-1/4, fold at score line and burnish with bone folder.
2.  Use Memento Black ink to stamp signature stamp on back of card base.
3.  Stamp flower on lower right corner of inside panel using Memento Black ink.  Color using markers.
4.  Adhere inside panel to inside of card base.  
5.  Emboss the 4-1/8 x 5-3/8 Highland Heather cardstock using the Subtles Embossing Folder.  Adhere embossed cardstock to front of card base.
6.  Adhere Gingham DSP to Whisper White cardstock.  Tie linen Thread around panel.  Attach to front of card base using dimensionals.
7.  Use next to largest scalloped frame die from the Stitched So Sweetly dies to cut a panel from Whisper White cardstock.  
8.  Use Memento Black ink to stamp flowers on scraps of Whisper White cardstock.  Color using markers.  Cut out using Garden Gateway Dies and Big Shot.  Adhere flowers to scalloped die cut.
9.  Attach scalloped panel to card front using dimensionals.
10.  Stamp sentiment from LABEL ME BOLD stamp set on scrap of Whisper White cardstock using Memento Black ink.  Fussy cut using scissors.  Adhere to scalloped panel (see sample for placement).
11.  Add rhinestones (see sample for placement).

Thanks for stopping by to visit my little blog.  These are crazy days with the Coronovirus fears; we all need to take good care of ourselves and our families.  Stamping and crafting are good ways to help keep your sanity while you are staying in more.  Doyle and I are also trying to take a walk around our neighborhood (even on the cooler days it is good to get out of the house for a few minutes) and we are meeting our new neighbors when they are outside!    

Happy crafting,
Linda 


Friday, January 15, 2016

Birthday Card for Hubby!

My husband's birthday is the first part of January; because it is so soon after Christmas it is always hard to get a nice card made for his birthday.  This year, I managed to get one made the afternoon of his birthday.  Here is a picture for you:


Starting with Thanksgiving, we seemed to eat non-stop, especially more sweets, so the inside of the card was especially appropriate:


I LOVE this stamp set ("Party with Cake") and will be using it bunches this spring!

Here is my recipe for the card:

STAMPS:  Party with Cake

CARDSTOCK:
     Sahara Sand:  5-1/2 x 8-1/2, scored at 4-1/4
     Basic Black:  4 x 5-1/4
     It's My Party DSP Stack:  3-7/8 x 3-7/8
     It's My Party DSP Stack:  1-3/8 x 3-7/8
     Basic Black:  3/4 x 3-7/8
     Whisper White:  3 x 4-1/2
     INSIDE:
          Basic Black:  3-3/4 x 5
          Whisper White:  3-5/8 x 4-7/8

INK:  Memento Black, Melon Mambo

MARKERS:  Mint Macaron, Melon Mambo, Chocolate Chip, So Saffron

ACCESSORIES:  It's My Party Enamel Dots, Baker's Twine Combo Pack, Scalloped Edge Border Punch (retired), Lots of Labels Framelits, Big Shot, Magnetic Platform, Dimensionals

Thanks for stopping by!

Happy stamping,
Linda

Saturday, May 23, 2015

From the Herd May Play Day Project!

Hi, Friends,
We have a beautiful Saturday today, the sun is shining and it is just warm enough, absolutely awesome!  Today I am sharing with you a project using From the Herd, a stamp set found in the Occasions Mini Catalog.  Here is a picture:


This is such a fun card to make!  It makes me smile!  Here is my recipe:

STAMPS:  From the Herd

CARDSTOCK:
     Real Red:  5-1/2 x 8-1/2, scored at 4-1/4
     Real Red 4 x 5-1/4
     Vellum CS:  4 x 5-1/4 (I cut mine at 3-7/8 x 5-1/8, making it smaller helps it NOT show when it
          is adhered to the card base)
     Sahara Sand:  4 x 5-1/4 (I cut mine at 3-7/8 x 5-1/8)
     SCRAPS:  Whisper White

INK:  Memento Black, Versamark

ACCESSORIES:  1 Circle Punch, Project Life Framelits, Big Shot, Magnetic Platform, White Embossing Power, Heat Gun, Embossing Buddy, Heat Gun, Dimensionals, Envelope Punch Board

Thanks for stopping by!

Happy stamping,
Linda