Sunday, October 24, 2021

SEASONS OF FUN HALLOWEEN CARD!

 Hi, Friends,

I am presently sitting at a table at a Scrapbook Retreat at Bell Buckle, TN, about ready to pack up and head home.  Here is a picture of our group:


For those of you who have attended retreats, we have eaten ALL weekend, stayed up too late, and had great fun just hanging out with each other.  Our “snack” table looked like this:


This didn’t include two Bread Basket cakes (one strawberry, one caramel) and one Coconut Cake!  

Anyway, there was a card on the card buffet at the Salvation Army Angel Tree Crop that I wanted to share before Halloween, so here it is:


 The Seasons of Fun stamp set is a hostess set that is offered in the July - December 2021 Mini Catalog.  It is such a cute set, but I almost missed seeing it in the catalog.


RECIPE:

     STAMPS:  Seasons of Fun

     CARDSTOCK:
          Crumb Cake:  5-1/2 x 8-1/2, scored at 4-1/4
          Pumpkin Pie:  4 x 5-1/4
          Cute Halloween DSP:  3-7/8 x 3-7/8
          Regals DSP (R):  1-1/2 x 3-7/8
               SCRAPS:  Basic Black, Pumpkin Pie, Basic White
               INSIDE:  
                    Pumpkin Pie:  3-3/4 x 5
                    Basic White:  3-5/8 x 4-7/8

     INK:  Memento Black

     BLENDS:  Pumpkin Pie (D), Basic Black (L), Old Olive (D), Soft Suede (L), Ivory, Petal Pink (D)

     ACCESSORIES:  Squares Layering Dies (R), SU Die Cut Machine, Stitched Shapes Dies (R), Rhinestones, Dimensionals


These stamps are just the cutest ever!  I love the black gingham ribbon, too!  Think outside the box and you can use this ribbon on lots of projects, NOT just Halloween!

HOW I MADE IT:

1.  Use Memento Black ink to stamp signature stamp on back of card base.

2.  Stamp three leaves on lower right corner of inside panel using Memento Black ink.  Color using markers.

3.  Adhere inside panels together; adhere to inside of card base.

4.  Adhere patterned paper to Pumpkin Pie cardstock.  Tie ribbon at seam of patterned paper.  Adhere panel to front of card base.

5.  Use Memento Black ink to stamp focal image on scrap of Basic White cardstock.  Cut out using die and SU Die Cut machine.  Color using markers.

6.  Adhere stamped image to Pumpkin Pie cardstock scalloped die cut, then adhere to Basic Black square.

7.  Attach stamped image to to front of card base using dimensionals.

8.  Add rhinestones (see sample for placement).


The inside of the card is simple, just a few leaves colored with different colored markers.

If you are a Braves fan, I hope you get to watch some awesome World Series games this week!  We watched the game last night and cheered loudly with all the other fans at the end!  


Thanks for stopping by and I hope you enjoyed my project!

Happy stamping,

Linda

Friday, October 22, 2021

WELL-DEFINED HALLOWEEN CARD!

 Hi, Friends,

When I was on the Maui Incentive Trip last May, I received the Well-Defined stamp set (I think it was when I spun the wheel).  I was happy for ALL the free product we got, but I looked at this stamp set and thought “what will I use this set for”?  Well, fast forward to this fall when I was planning cards for a card buffet, and I happened to have the Cute Halloween DSP on my desk and this card “happened”!  I actually really liked it!  I wanted to get this card posted before Halloween, so here goes:


RECIPE:

     CARDSTOCK:

           Smoky Slate:  5-1/2 x 8-1/2, scored at 4-1/4

           Basic Black:  4 x 5-1/4

           Cute Halloween DSP:  3-7/8 x 3-7/8

           Cute Halloween DSP:  1-1/2 x 3-7/8

           Basic Black:  3/4 x 4

                SCRAPS:  Basic White, Pumpkin Pie

                INSIDE:  

                     Basic Black:  3-3/4 x 5

                     Basic White:  3-5/8 x 4-7/8

INK:  Memento Black

ACCESSORIES:  Stitched Shapes Dies (R), Layering Squares Dies (R), Stampin’ Up! Die Cut Machine, Linen Thread, Dimensionals


The inside of the card looks like this:


HOW I MADE IT:

1.  Use Memento Black ink to stamp signature stamp on back of card base.

2.  Stamp bats on lower right corner of inside panel using Memento Black ink.

3.  Adhere inside panels together; adhere to inside of card base.

4.  Adhere patterned paper to Basic Black cardstock.  Adhere Basic Black strip at seam of paper.  Tie linen thread around Basic Black strip.

5.  Adhere panel to front of card base.

6.  Use Memento Black ink to stamp sentiment on Basic White scrap.  Cut out using die and Stampin’ Up! Die Cut machine.

7.  Adhere sentiment to Pumpkin Pie scalloped die cut.

8.  Attach sentiment panel to front of card base using dimensionals.


I hope you are having a good week.  Thank you so much for stopping by today!  I have a second Halloween card I want to share soon.

Happy stamping,

Linda


Saturday, October 9, 2021

DAISY GARDEN THINKING OF YOU! PLAY DAY PROJECT TWO!

 Hi, Friends,

The kitties are sleeping, so this is a good time for me to try to do a blog post.  They think they can “help” with everything, including computer work.  Here is a picture of them, looking out my craft room window:


I have been trying to let them into my craft room when I am in there.  So far, it has worked OK, but Zoe is a climber (she climbed my three tiered card!) so it is probably just a matter of time before they manage to get to the top of my craft desk.  I do enjoy it when they sleep under the desk while I am working!

Today I am sharing the second project we made at October Play Day:


This card uses the Daisy Garden background stamp.  We simply stamped the image using Night of Navy ink and colored it using Blends markers!  I like the colors we used (Night of Navy and Granny Apple Green)—I like green/blue combinations!

MY RECIPE:

     STAMPS:  Daisy Garden, Blossoms in Bloom

     CARDSTOCK:
          Night of Navy:  5-1/2 x 8-1/2, scored at 4-1/4
          Granny Apple Green:  3-3/4 x 5
          Basic White:  3-5/8 x 4-7/8
               SCRAPS:  Basic White, Granny Apple Green
               INSIDE:
                    Granny Apple Green:  3-3/4 x 5
                    Basic White:  3-4/8 x 4-7/8

     INK:  Night of Navy

     BLENDS:  Daffodil Delight (D), Granny Apple Green (D)

     ACCESSORIES:  Ovals Layering Dies (Retired), SU Die Cut Machine, Linen Thread, Pearls, Dimensionals


When I am inking up a big stamp (like a background stamp) I like to lay it on the table, rubber side up, open the ink pad and apply the ink by tapping the ink pad on the stamp.  It is the easiest way I have found to get the ink evenly on the stamp.

HOW I MADE IT:

1.  Use the Night of Navy ink to stamp signature stamp on back of card base.

2.  Stamp a small portion of the Daisy Garden stamp on the lower right corner of the inside panel.  Color using markers.


3.  Adhere inside panels together.  Adhere to inside of card base.

4.  Lay large flower stamp flat on the table with rubber side up.  Ink stamp with Night of Navy ink.  Lay Basic White cardstock on top of stamp.  Cover with scrap paper.  Holding papers still with one hand, rub the scrap paper all over.  Remove scrap paper and stamped image from stamp.

5.  Color stamped image using markers.

6.  Adhere stamped and colored image to Granny Apply Green cardstock.  Tie linen thread around the panel, then tie in knot.

7.  Adhere stamped panel to front of card base.

8.  Use Night of Navy ink to stamp sentiment on scrap of Basic White cardstock.  Cut out using die and SU Die Cut Machnie.

9.  Adhere sentiment to Granny Apple Green scalloped die cut.

10.  Attach sentiment to front of card using dimensionals.

11.  Add pearls (see sample for placement).


 You will especially like this card if you love coloring!  By NOT coloring the flower petals, it does speed up the coloring process.  

This card was greatly influenced by one I found on Pinterest created by Diane Hutchinson, craftsbythebow.blogspot.com, post dated July 28, 2021.  I like to give credit where credit is due!

Thanks for stopping by today; I certainly hope you enjoyed the project I shared.  I have several Christmas projects to share with you over the coming days.

Happy stamping,
Linda


Thursday, October 7, 2021

GARDEN BIRDHOUSES—OCTOBER 2021 PLAY DAY PROJECT ONE!

 Hi, Friends,

Just wanted to stop by today and share with you one of the projects we made at Play Day last Saturday.


This project was CASED from Tracy Bradley, stampingwithtracy.com, post dated July 20, 2021.  I was quite busy the week before Play Day, and often look to other’s projects to at least give me a starting point for a project when I am a bit overwhelmed.

MY RECIPE:

     STAMPS:  Garden Birdhouses

     CARDSTOCK:
          Crumb Cake:  5-1/2 x 8-1/2, scored at 4-1/4
          Balmy Blue:  4 x 5-1/4
          Sweet Symetry DSP:  3-7/8 x 5-1/8
               SCRAPS:  Basic White, Balmy Blue, Crumb Cake
          INSIDE:
               Misty Moonlight:  3-3/4 x 5
               Basic White:  3-5/8 x 4-7/8

     INK:  Early Espresso

     BLENDS:  Misty Moonlight (L), Balmy Blue (D), Mossy Meadow (L), Crumb Cake (D)

     ACCESSORIES:  Ornate Frames Dies, Stitched Rectangles Dies, SU Die Cut Machine, Linen Thread, Metallic Pearls, Dimensionals


I like using the Garden Birdhouse Stamp Set because it is so versatile—can be either masculine or feminine, and can be used for LOTS of occasions—just change the sentiment to one that is appropriate.


HOW I MADE IT:

1.  Use Early Espresso ink to stamp signature stamp on back of card base.

2.  Stamp branch and bird on lower right corner of inside panel using Early Espresso ink.  Color using markers.

3.  Use Early Espresso ink to stamp sentiment toward top center of inside panel.

4.  Adhere inside panels together; adhere to inside of card base.

5.  Adhere patterned paper to Balmy Blue cardstock.  Wrap linen thread around panel about 1-1/4” from bottom; tie in a knot.

6.  Adhere above panel to front of card base.  

7.  Stamp branch, birdhouse and bird on scrap of Basic White cardstock, using Early Espresso ink.  Cut out using die and SU Die Cut Machine.  Color using markers.

8.  Adhere stamped image to Balmy Blue die cut.

9.  Attach focal image panel to front of card base, using dimensionals.

10.  Stamp sentiment using Early Espresso ink on scrap of Crumb Cake cardstock.  Cut out using die and SU Die Cut Machine.

11.  Attach sentiment to card front using adhesive (on left side) and dimensional (on right side).

12.  Add metallic pearls; see sample for placement.


Thanks so much for stopping by today!  I appreciate each of you!


Happy stamping,
Linda


Monday, October 4, 2021

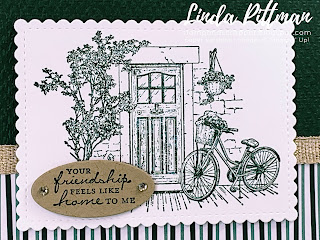
FEELS LIKE HOME FOR CARD BUFFET!

 Hi, Friends,

I sat down to work on this blog post and had a sweet kitten named Zoe crawl up and lay beside me.  The girls have been playing hard all morning and I figured it was about time that they crashed for a nap!  They have LOTS of energy—I kind of wish they could loan me some!  


I want to share a card with you today that I had on the card buffet at the Blessings Crop/Angel Tree Crop a week ago.  I kind of wondered what to do with this set (Feels Like Home) that was on the Sale-a-Bration this fall, and was surprised at how easy this card is, and also that the Christmas DSP, Tidings of Christmas, would make such a good match with it!  This card was inspired by one designed by Libby Fens, libbystamps.com, post dated September 11, 2021.   Here is a picture of my card:


MY RECIPE:

     STAMPS:  Feels Like Home (SAB, Fall 2021)

     CARDSTOCK:
          Soft Succulent:  5-1/2 x 8-1/2, scored at 4-1/4
          Evening Evergreen:  4 x 5-1/4
          Tidings of Christmas DSP:  1-1/2 x 5-1/8
               SCRAPS:  Crumb Cake, Basic White
               INSIDE:
                    Evening Evergreen:  3-3/4 x 5
                    Basic White:  3-5/8 x 4-7/8

     INK:  Evening Evergreen

     ACCESSORIES:  Stitched So Sweetly Dies, Layering Ovals Dies (Retired), SU Die Cut Machine, Fine Art Ribbon, Rhinestones, Dimensionals


I love how detailed this stamp is, but really don’t want to color all the details in, so it was a good one to just stamp and leave it alone!

HOW I MADE IT:

1.  Use Evening Evergreen ink to stamp signature stamp on back of card base.

2.  Stamp flower pot image on lower right corner of inside panel using Evening Evergreen ink.

3.  Adhere inside panels together; adhere to inside of card base.

4.  Adhere striped DSP to bottom of embossed Evening Evergreen panel.

5.  Adhere ribbon to seam of above panel.  Adhere ends of ribbon to back of panel.

6.  Adhere panel to front of card base.

7.  Use Evening Evergreen ink to stamp door image on scrap of Basic White cardstock.  Cut out using die cut and SU Die Cut Machine.

8.  Attach focal image to front of card base using dimensionals.

9.  Stamp sentiment using Evening Evergreen ink on scrap of Crumb Cake cardstock.  Cut out using die and SU Die Cut Machine.

10.  Attach sentiment to front of card base using dimensionals.

11.  Add rhinestones (see sample for placement).


I simply stamped the little pot of flowers on the inside of the card.  It adds just the perfect touch!


Well, Zoe is now sound asleep on the couch by my feet!  Chloe is trying to catch flies that are on the outside of the window, so don’t think she will be napping anytime soon!  

I hope you enjoyed this project!  I hope to share more projects tomorrow!

Thanks for stopping by!

Happy stamping,
 Linda