Tuesday, June 16, 2020

ORNATE GARDEN/SO SENTIMENTAL GET WELL CARD!

Hi, Friends,
It is a beautiful day in the neighborhood today, also a busy one.  They have delivered the cabinets to two houses, sheet rock to a third house, and are prepping the house across the street to finish painting.  I love all the activity (maybe except when there is annoying noise for a long period of time).

Anyway, today I have another project to share with you.  I couldn’t get to sleep the other night and got up and started messing with this card, but, as simple as it is, I didn’t get it finished until yesterday.  I just kept playing with it and moving things around until I liked it!  Here is my project:


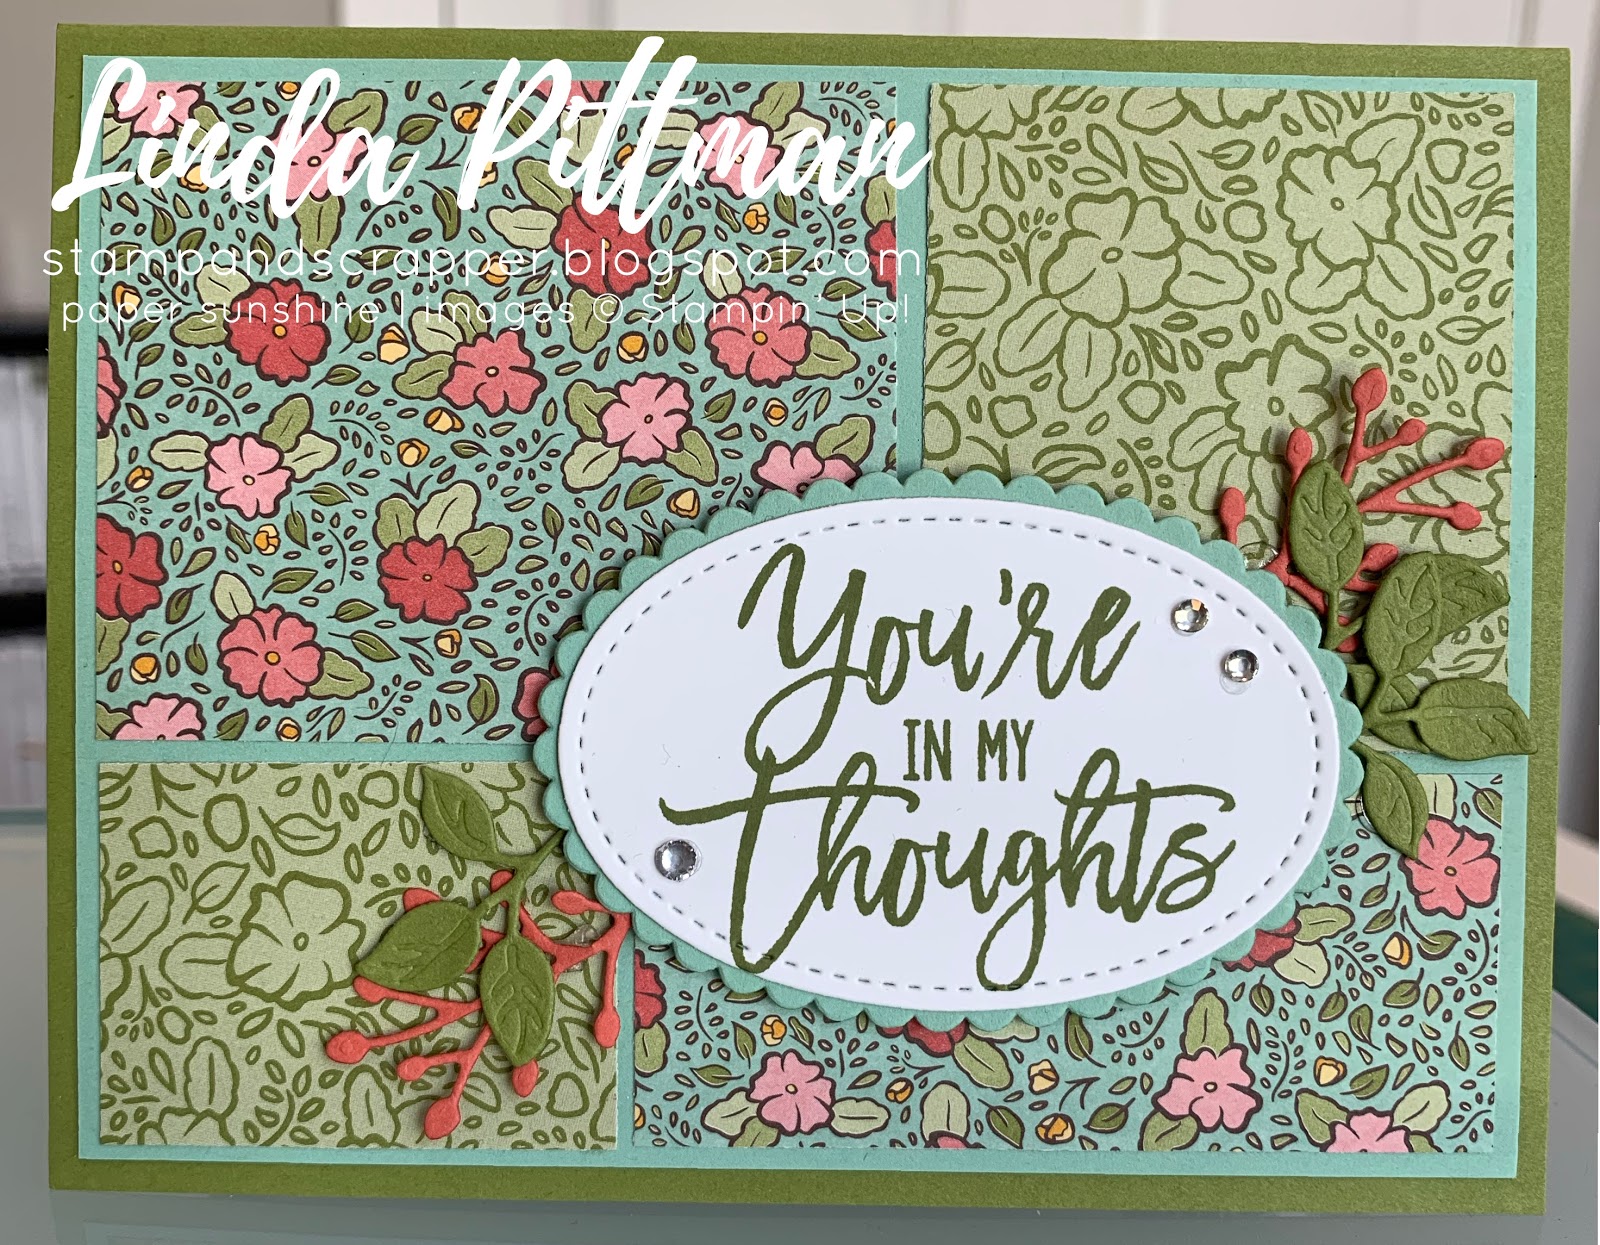
I LOVE the various combinations of the Designer Series Paper in the Ornate Garden Suite, and really like the DSP combo in this card.  

MY RECIPE FOR THIS CARD:

STAMPS:  So Sentimental, Accented Blooms (Retired)

CARDSTOCK:
     Crumb Cake:  5-1/2 x 8-1/2, scored at 4-1/4
     Old Olive:  3-5/8 X 4-7/8
     Ornate Garden DSP:  3-1/2 X 3-1/2
     Ornate Garden DSP:  1-3/4 x 3-1/2
     SCRAPS:  Terracotta Tile, Old Olive, Whisper White
     INSIDE:
          Old Olive:  3-3/4 x 5
          Whisper White:  3-5/8 x 4-7/8

INK:  Terracotta Tile, Memento Black

BLENDS:  Petal Pink, Cajun Craze, Old Olive

ACCESSORIES:  Ornate Layers Dies, Stitched Shapes Dies, Circles Layering Dies, Birthday Dies (Retired), Magnetic Platform, Big Shot, Gilded Gems, Dimensionals, Glue Dots

A closer look at the sentiment panel:


HOW I MADE THE CARD:

1.  Using scoreboard, score Crumb Cake card base at 4-1/4.  Fold card base and burnish using bone folder.

2.  Stamp the signature stamp on the back of the card base using Memento Black ink.

3.  Use Memento Black ink to stamp the small flower stamp on the lower right corner of the inside panel.  Color using markers.

4.  Adhere inside cardstock panels together.  Adhere to inside of card base.

5.  Adhere DSP panels to Old Olive cardstock. 

6.  Cut rectangle from scrap of Terracotta Tile cardstock using die from Ornate Layers Dies and Big Shot.   Adhere to seam of Designer Series Paper.

7.  Adhere panel to front of card base.

8.  Stamp sentiment using Terracotta Tile ink onto scrap of Whisper White cardstock.  Cut out using Stitched Shapes Dies and Big Shot.

9.  Use Layering Circles Dies to cut scalloped circle from scrap of Old Olive cardstock.

10.  Adhere stamped circle onto Old Olive scalloped circle.  Attach to front of card base using dimensionals.

11.  Cut small leaves from scraps of Old Olive cardstock scrap using Birthday Dies and Big Shot.  Adhere behind sentiment circle using Glue Dots.

12.  Add Gilded Gems to either side of the Terracotta Tile rectangle die cut.  See sample for placement.

Here is what the inside of the card looks like:


and a close up of the flower on the inside:


I hope you enjoyed my project today as much as I enjoyed making it!  Craft a masterpiece and surprise someone with it today!

Happy stamping,
Linda


Tuesday, June 9, 2020

ORNATE LAYERS DIES SHOWCASED!

Hi, Friends,

It keeps raining today!  I look up and there is sunshine, then it gets cloudy, then it gets dark, then it rains (repeat, repeat, repeat).  But I GOT to go to the grocery wearing my new leopard skin face mask, and it wasn’t raining then and I got to walk around the neighborhood after dinner and it wasn’t raining then, either!  But the BEST part of the day was making another inspiration card for the Ornate Garden Suite Sampler!


This is the Ornate Garden Suite Sampler for June—see my post dated June 4, 2020 for details!  If you look carefully, you can see a die cut in Terracotta Tile that I used on this card.  


I love the way this card turned out!  Here is my recipe:

STAMPS:  Ornate Style, Rooted in Nature

CARDSTOCK:
     Crumb Cake:  5-1/2 x 8-1/2, scored at 4-1/4
     Terracotta Tile:  4-1/8 x 5-3/8
     Early Espresso:  4 x 4
     Whisper White:  3-7/8 x 3-7/8
     SCRAPS:  Crumb Cake, Terracotta Tile
          INSIDE:
               Early Espresso:  3-3/4 x 5
               Whisper White:  3-5/8 x 4-7/8

INK:  Early Espresso

BLENDS:  Old Olive (L), Daffodil Delight (D), Petal Pink (D), Cajun Craze (L)

ACCESSORIES:  Ornate Layers Dies, Magnetic Platform, Big Shot, Subtles Embossing Folder, Gilded Gems

Notice that I didn't use a single dimensional on this card (I don't do that very often)!

A picture of the intricate Terracotta Tile die cut up close, with the new Gilded Gems embellishing it:


HOW I MADE IT:

1.  Use scoreboard to score card base at 4-1/4; fold and burnish with bone folder.

2.  Stamp signature stamp using Early Espresso ink on back of card base.

3.  Use Early Espresso ink to stamp corner of flower stamp on lower right corner of inside panel.  Color using markers.

4.  Adhere inside panels together; adhere to inside of card base.

5.  Emboss Terracotta Tile cardstock using Subtles Embossing Folder and Big Shot.  Adhere to front of card base.

6.  Use Ornate Layers Dies to cut die cut from scrap of Terracotta Tile cardstock.  Cut scrap of Crumb Cake cardstock to adhere behind the die cut.  Adhere die cut panel to front of card base (see sample for placement).

7.  Stamp sentiment using Early Espresso ink on upper right corner of Whisper White cardstock.  Use Early Espresso to stamp flower stamp on left side and lower right side of the Whisper White panel.  Color flowers using markers.

8.  Adhere stamped panel to Early Espresso cardstock.  Adhere to front of card base.

9.  Add Gilded Gems to die cut on front of card (see sample for placement).

Here is a picture of the inside of the card:


I hope you have had an awesome day today.  Make sure to find some time for crafting!  

Happy stamping,
Linda


Monday, June 8, 2020

ORNATE GARDEN SUITE SAMPLER—TAKE TWO!

Hi, Friends,
It is a beautiful day in the neighborhood today, but very warm, somewhere around 90 degrees!  But it is sunny, so I will keep it; I LOVE a beautiful sunny day!

As promised, I will be sharing projects using the Ornate Garden Suite products, so here is another project (I actually made a second version using a second sentiment which I will also share).  This one features the Ornate Floral Embossing Folder and a die from the Ornate Layers Dies.

CARD ONE:


CARD RECIPE:

STAMPS:  Ornate Style, Ornate Thanks

CARDSTOCK:
     Crumb Cake:  5-1/2 x 8-1/2, scored at 4-1/4
     Old Olive:  4 x 5-1/4
     Whisper White:  3-7/8 x 3-7/8
     Ornate Garden DSP:  1-1/2 x 3-7/8
     SCRAPS:  Old Olive, Whisper White
          INSIDE:
               Old Olive:  3-3/4 x 5
               Whisper White:  3-5/8 x 4-7/8

INK:  Old Olive, Memento Black, Crumb Cake

BLENDS:  Old Olive, Mango Melody, Pumpkin Pie

ACCESSORIES:  Ornate Floral Embossing Folder, Ornate Layers Dies, Stitched Rectangles Dies, Magnetic Platform, Big Shot, Ornate Garden Ribbon Combo Pack, Rhinestones


Here is a closer picture of the sentiment layers.  I stamped the "THANKS" using Old Olive ink and the "for everything" with Crumb Cake ink.


HOW I MADE IT:

1.  Use scoreboard to score card base at 4-1/4.  Fold card and burnish with bone folder.

2.  Stamp signature stamp on back of card using Old Olive ink.

3.  Stamp flower using Memento Black ink on lower right corner of inside panel.  Color using markers.  Adhere inside panels together; adhere to inside of card base.

4.  Emboss Whisper White panel using the Ornate Floral Embossing Folder and Big Shot.  Adhere to top of Old Olive cardstock panel.

5.  Adhere Designer Series Paper to bottom of Old Olive cardstock panel.  Adhere Old Olive ribbon at seam.

6.  Adhere Old Olive panel to front of card base.

7.  Use Ornate Layers Dies and Big Shot to cut Old Olive die cut.

8.  Stamp sentiment on scrap of Whisper White Cardstock using Old Olive and Crumb Cake ink pads.  Cut out using Stitched Rectangle Dies and Big Shot.  

9.  Adhere sentiment panel to Ornate Layers die cut.  Adhere to card front (I did not use dimensionals).

10.  Add rhinestones to sentiment panel (see sample for placement).

Here is a picture of the inside of the card:


CARD TWO:


This card is the same as the first card, except I used a different sentiment which is from the Peaceful Moments stamp set.

Closer picture of the sentiment:


Inside of card:


Thanks for stopping by and visiting my blog today!  Hope you have a wonderful day with at least a bit of time for crafting!

Happy stamping,
Linda


Friday, June 5, 2020

ORNATE GARDEN SUITE SAMPLER SAMPLE!

Hi, Friends,
Try saying that three times fast (the post title)!  As promised, I am sharing with you today two cards that could be made with the Ornate Garden Suite Sampler.  These cards do not use the Ornate Style or the Ornate Thanks stamp sets.  I did this purposefully so that you could see that you could make a beautiful card even if you don’t own the stamp set!

Here is my first card:


My recipe for this card:

STAMPS:  Thoughtful Branches (Retired)

CARDSTOCK:  
     Old Olive:  5-1/2 x 8-1/2 scored at 4-1/4
     Mint Macaron:  4-1/4 x 5
     Ornate Garden DSP:  3-7/8 x 3-7/8
     Ornate Garden DSP:  1-1/2 x 3-7/8
     SCRAPS:  Mint Macaron, Whisper White, Terracotta Tile
     INSIDE:  
          Mint Macaron:  3-3/4 x 5
          Whisper White:  3-5/8 x 4-7/8

INK:  Old Olive

ACCESSORIES:  Stitched Shapes Dies, Ovals Layering Dies, Birthday Dies (Retired), Magnetic Platform, Big Shot, Old Olive/Pretty Peacock Reversible Ribbon, Dimensionals, Rhinestones, Glue Dots

Here is a closer picture of the sentiment.  If you don't have the same dies, use what you have!  The same goes for the die cut pieces behind the sentiment--if you don't have the Birthday Dies, use something that you already have.  


HOW TO MAKE IT:

1.  Use scoring tool to score the card base at 4-1/4.  Fold the card and burnish the fold with a bone folder.

2.  Use Old Olive ink to stamp a signature stamp on the back of your card base.

3.  Stamp the leaf from the Thoughtful Branches set on the lower right corner of the inside panel using Old Olive ink.

4.  Adhere the inside panels together; adhere to inside of card base.

5.  Adhere the square DSP panel to the top of the Mint Macaron cardstock.  Adhere the smaller rectangle DSP panel to the bottom of the Mint Macaron cardstock.  Adhere ribbon to the seam of the DSP.  

6.  Adhere the above panel to the front of the card base.

7.  Use Old Olive ink to stamp the sentiment on a scrap of Whisper White cardstock.  Cut out using the Stitched Shapes Dies, Magnetic Platform, and Big Shot.

8.  Cut out scalloped oval from scrap of Mint Macaron cardstock using Layering Ovals Dies, Magnetic Platform, and Big Shot.  Adhere the stamped sentiment oval to the scalloped oval.  

9.  Cut out leaves and sprigs from Old Olive and Terracotta Tile cardstock scraps, using Birthday Dies, Magnetic Platform and Big Shot. 

10.  Lay sentiment oval on card front in approximately the place you will adhere it.  Add glue dots to leaves and attach them to the card front, taking care to place them where you like the way they look and show when the sentiment oval is attached to the card front.

11.  Attach sentiment oval to card front using dimensionals.

12.  Add rhinestones.  See sample for placement.


CARD TWO:

Card Two uses most of the same products as Card One, but is laid out with a different orientation (landscape vs. portrait) and has different cuts of the DSP:


My recipe for this card:

STAMPS:  Thoughtful Branches (Retired)

CARDSTOCK:
     Old Olive:  5-1/2 x 8-1/2, scored at 4-1/4
     Mint Macaron:  4-1/4 x 5
     Ornate Garden DSP:  2-3/8 x 2-7/8
     Ornate Garden DSP:  2-1/8 x 2-3/8
     Ornate Garden DSP:  1-3/8 x 1-7/8
     Ornate Garden DSP:  1-3/8 x 3-1/8
     SCRAPS:  Mint Macaron, Whisper White, Old Olive, Terracotta Tile
          INSIDE:
               Mint Macaron:  3-3/4 x 5
               Whisper White:  3-5/8 x 4-7/8
  
INK:  Old Olive

ACCESSORIES:  Stitched Shapes Dies, Ovals Layering Dies, Birthday Dies (Retired), Magnetic Platform, Big Shot, Dimensionals, Rhinestones, Glue Dots

This is a larger picture of the sentiment panel:


And this is a picture of the inside of the card:


HOW I MADE IT:

1.  Use scoring tool to score card base at 4-1/4.  Fold card and burnish with a bone folder.

2.  Use Old Olive ink to stamp signature stamp on back of card base.

3.  Stamp leaf from Thoughtful Branches stamp set on lower right corner of inside card panel.

4.  Adhere inside panels together; adhere to inside of card base.

5.  Adhere DSP panels to Mint Macaron cardstock.  See sample for placement.

6.  Adhere above panel to front of card base.

7.  Use Old Olive ink to stamp sentiment on scrap of Whisper White cardstock.  Cut out using Stitched Shapes Dies, Magnetic Platform, and Big Shot.

8.  Cut scalloped oval from scrap of Mint Macaron cardstock using Layering Oval Dies, Magnetic Platform, and Big Shot.  

9.  Adhere stamped sentiment oval to the scalloped oval.  

10.  Cut leaves and sprigs from Old Olive and Terracotta Tile cardstock scraps, using the dies from Birthday Dies, Magnetic Platform, and Big Shot.

11.  Lay stamped sentiment oval in the approximate position you will adhere it to later.  Add glue dots to leaves and sprigs, and adhere them to the card front, paying attention to the position of the stamped sentiment oval.  

12.  Use dimensionals to adhere the stamped sentiment oval to the front of the card base.

13.  Add rhinestones; see sample for placement.

If you want to see what the Ornate Garden Suite Sampler looks like, here is a quick picture!  I added a tag and listed the coordinating colors of the Ornate Garden DSP for your convenience!  The little flower on the tag is from the Ornate Style Stamp Set, colored with Mint Macaron and Old Olive Blends.


If you need more information about the Suite Samplers, please see my post from yesterday (June 4, 2020).  

Hope this gives you a couple of ideas about how you can use the contents of a Suite Sampler to make some awesome cards!  I will be back soon with some more possibilities!

Have an amazing weekend--hope it includes a bit of crafting!

Happy stamping,
Linda


Thursday, June 4, 2020

Introducing Suite Samplers!

Hi Crafty Friends,

I hope you are having an awesome day!  It is certainly beautiful outdoors, sunny and just about perfect temperatures!  I hope to go on a walk in a little while.

For quite a while, I have been struggling to figure out how to get new product into your hands.  We haven't been able to have Play Day, first because of my move, and then because of the COVID virus.  With COVID numbers still on the rise, even though shops and restaurants are opening up, I don't feel right having a large number of people coming together.  So, I finally came up with an idea, which I am presenting to you today!

How about a monthly sampler?   Our first sampler will be the Ornate Garden Sampler.  You can find the Ornate Garden Suite on pages 64 - 67 of the brand new 2020-2021 catalog.  The Suite has not one, but two bundles:


This is the Ornate Thanks bundle (Item 154115 $46.75) which includes the Ornate Thanks stamp set (Item 149471 $18.00) and the Ornate Borders Dies (Item 152724 $34.00).


And this is the Ornate Style Bundle (Item 152572 $52.00) which includes the Ornate Style Stamp Set (Item 152572 $21.00) and the Ornate Layers Dies (Item 152726 $37.00).  

And a gorgeous embossing folder called Ornate Floral Embossing Folder:


The Ornate Garden Specialty Designer Series Paper (Item 152488 $15.00) is beautiful!  There is even some gold foil designs on a few of the sheets!


So when I talk about an Ornate Style Sampler, what do I mean?  

First, exactly what comes in the Ornate Style Sampler?

     12--4x6 pieces Ornate Garden DSP
     12--Card Bases (2 each of the following colors--scored and folded)
          Crumb Cake
          Early Espresso
          Bumblebee (new in-color)
          Mint Macaron
          Old Olive
          Terracotta Tile
     12--4-1/4 x 5-1/2 Cardstock Pieces (2 each of the above colors
     18 Gilded Gems
     1 Yard (each color--Old Olive/Terracotta Tile) Ribbon
          (Ornate Garden Ribbon Combo)
     4--Whisper White Cardstock Pieces (4-1/4 x 5-1/2) 
          (embossed with Ornate Floral 3D Embossing Folder)
     3--Miscellaneous Die Cuts (Ornate Layers Dies)

All of the pieces together look something like this:


I cut the pieces of DSP into 4 x 6 because that is the easiest way for me to fit them into a box to ship.  But it is also a convenient size for use in card making.  

The cardstock pieces can be used to die cut pieces, or as an extra card layer.  

How are you supposed to use these materials?  That is up to you!  There will be NO written instructions for specific projects included with the kit.  However, I will be posting samples using the Ornate Garden Suite between now and June 15 to give you some ideas.  I will post a minimum of four to six ideas.

How much does the Ornate Garden Sampler cost?  It depends on how you get it.  If you can do porch pickup (that means I will have the package in a storage cube on my front porch; you will come to my house and pick it up) the cost will be $15.00.  However, the price to ship the sampler is $8.30, so your cost to have it shipped will be $24.00.  The cost of the sampler will change each month according to the product that is included.  I will keep it close to the $15.00 base price.

How do I pay?  If you want to get your sampler, you need to mail me a check that I receive by Monday, June 15.  The 15th will be a firm date, no orders accepted after that time for this month.  On June 15, I will begin to cut the samplers.  I will not start cutting prior to the cut off date, because I don't want extra kits that are cut up.  It will depend on how many people order the kits how quickly I can get them out, but they will be cut by June 22 (one week after the cut off).   I will email you when your kit is ready for pickup.  If you are doing porch pickup, you will let me know when you plan to pick up your sampler and I will have it in a bin on my front porch on that day.  I will not leave the kits out except on the day when you are picking them up since they are paper and susceptible to weather conditions.  Because they are easier to prepare, the porch pickups will be ready prior to the shipped samplers.  When the samplers are ready to ship, I will email you so you can begin looking for the kit.

Future Samplers:  On about the 1st of the month, I will post the sampler for that month.  I will post projects spotlighting that suite (or group of products) from the 1st thru the 15th.  Payment for a sampler will be due on the 15th of the month to reserve your product.  

I hope this all makes sense.  The idea is to be able to have product in hand that you can make up to twelve cards with!  It will show you how beautiful the embossing folder is (which is hard to do with just a flat picture), the gorgeous Designer Series Paper, and a sample of the die cuts.  If you have questions, please comment, text or email me.  

Thanks so much for stopping by today!  Be watching for more posts of my Ornate Garden card samples.  I have been working on some of them, and I am excited to share them with you!

Happy stamping,
Linda