Monday, April 19, 2010

Color Renovations!

Stampin Up has announced a Color Renovation!  This means that we get to say goodbye to some of our old favorites (for me Brocade Blue), hello to some new wonderful colors (like Cherry Cobbler--doesn't that make you hungry?), and welcome back to some old in-colors (we get to keep Soft Suede!).  I am excited about all of the new possibilities with our new color lines, and can't wait to get to play with some of our new colors.  The new colors will be available beginning July 1 with the new catalog.

So, if you have old favorites you really don't want to part with, be sure you have all of the reinkers and markers and cardstock you want before we say goodbye in June!!!

Here are some charts showing new colors, returning in-colors, and retiring colors:


Here is a color chart to show you the new colors:

Saturday, April 17, 2010

January Play Day, Part One

We had four projects for our January Play Day. The first two projects will be in this post.

PROJECT ONE: LOVE YOU MUCH VALENTINE CARD

Stamps: Love You Much, Short and Sweet
Paper: Real Red, Basic Black, Whisper White
Ink: Basic Black Classic Ink Pad, Basic Black, Real Red and Summer Sun Markers
Accessories: Perfect Polka Dots Textured Impressions Folder, Big Shot, Frame Oval Scallop Die, Chipboard, Modern Label Punch, Word Window Punch, Dimensionals, Vintage Brads
Techniques: Dry Embossing (leaving flat oval in middle of card)

INSTRUCTIONS:
Cut Real Red cardstock (5-1/2 x 8-1/2; score at 4-1/4), Basic Black (4 x 5-1/4) and Whisper White (3-3/4 x 5). You will need scrap Whisper White and Real Red as well.

Cut Chipboard with the Frame Oval Scallop Die. Remove the oval, but leave the scallop frame in

Place Whisper White cardstock in the Perfect Polka Dots embossing folder.

SANDWICH:
Multipurpose Platform, no tabs
Cutting Pad
Chipboard with Oval Out
Embossing Folder
Cutting Pad

Run through Big Shot.

Color bird image from Love You Much with markers and stamp in the center of the oval on Whisper White cardstock. Color in beak with Summer Sun.

Adhere the Whisper White cardstock to the Basic Black. Adhere to the Real Red card base with dimensionals.

Stamp words from Short and Sweet with Basic Black ink on scrap Whisper White cardstock. Punch out the words with the Word Window Punch.

Use Modern Label punch with Real Red cardstock. Adhere the white Word Window punch out to the red Modern Label punch out. Use the paper piercer to punch small hole, using mat pack, on each end of the punched out pieces. Insert Black Vintage brads. Attach the punched out piece to the card with dimensionals.

This card was inspired by a card created by Tamara Bertram on Stampin Up's Stampers' Showcase.

PROJECT TWO: TWO TAG PUNCH VALENTINE BOOKMARK

Stamps: Love You Much, Define Your Life
Paper: Kraft, Soft Suede, Real Red
Ink: Real Red, Basic Black
Accessories: 1-1/4" and 1-3/8" Circle Punches, Paper Piercer, Mat Pack, Dimensionals, Circle Scallop Punch, Scissors, Two Tag Die, Big Shot

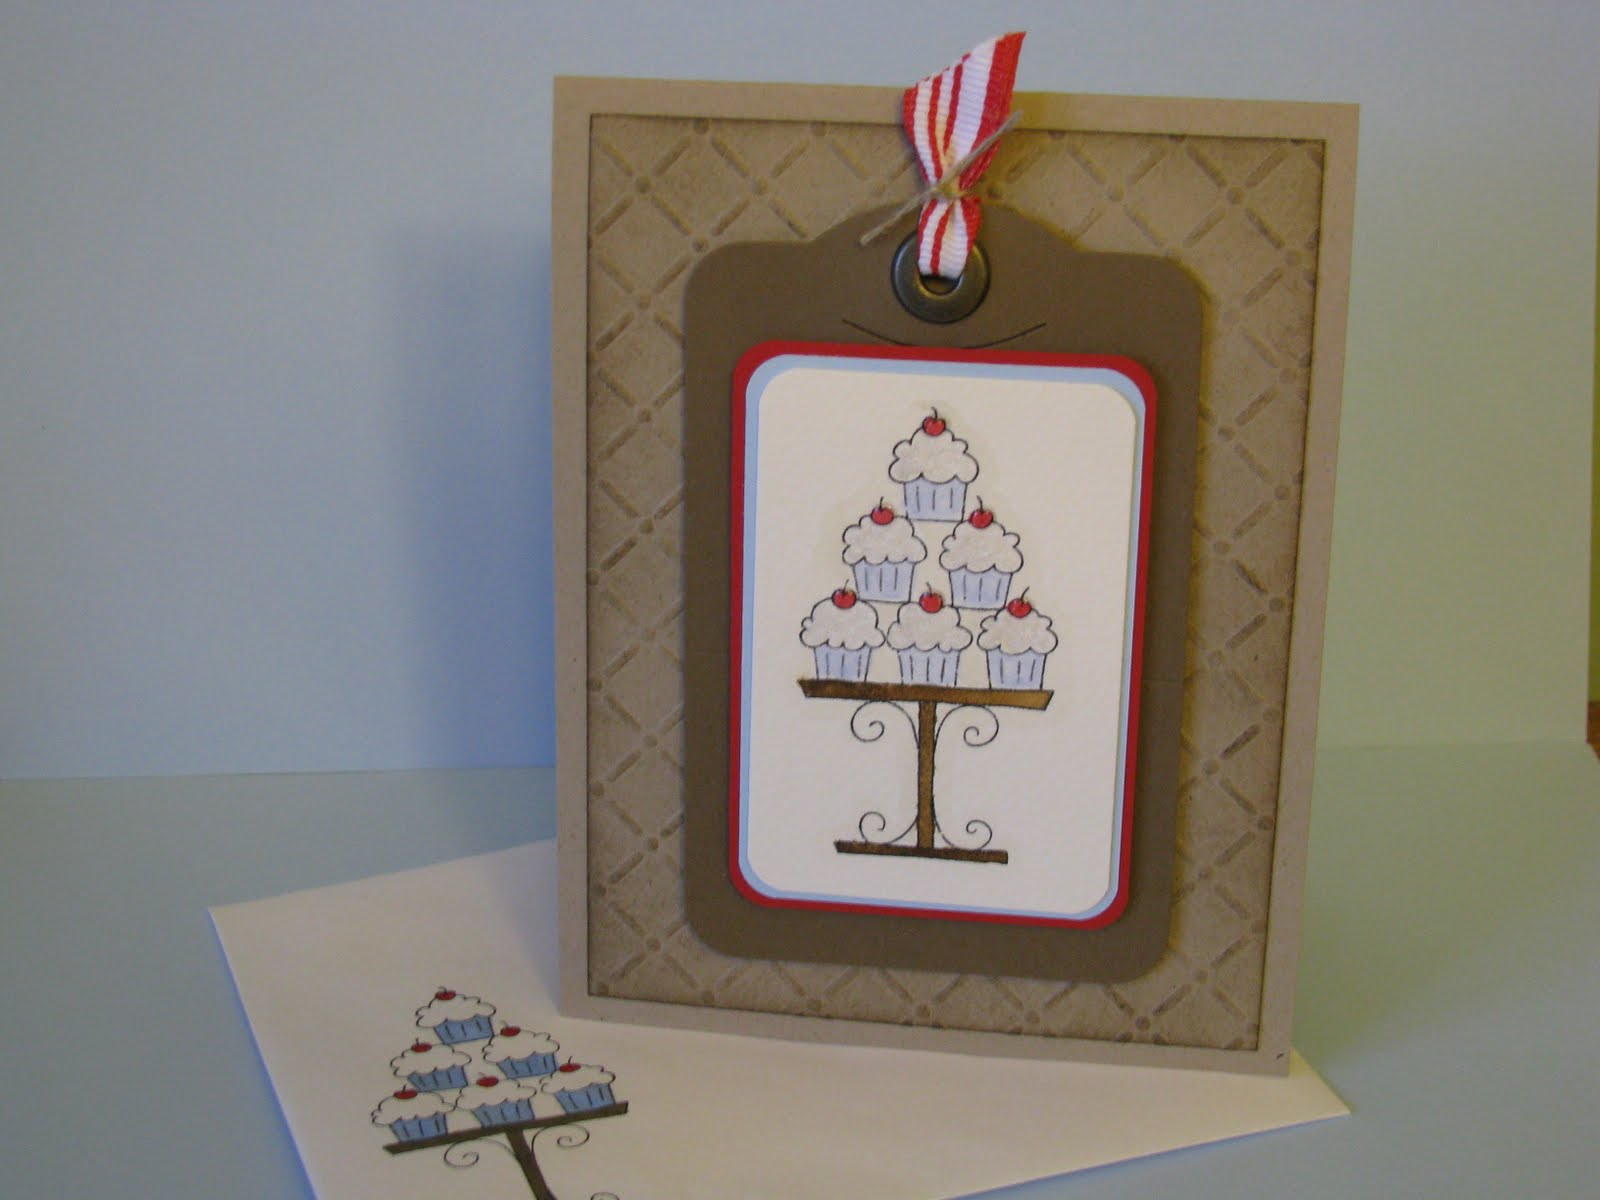
Adult Birthday Swap Card Project

This card was made for an Occasion's Swap. My category was Adult Birthday, and I made it masculine, since it is hard to have enough birthday cards for the guys in our families!


RECIPE:
Stamps: Crazy for Cupcakes

Two Tag Die: Soft Suede, Punch larger hole with Crop-a-dile, attach Jumbo Antique Brass
Eyelet using Crop-a-dile

Cardstock:
Kraft (4-1/4" x 11", scored at 5-1/2")
Kraft (3-7/8" x 5-3/16"; run thru Big Shot w/Perfect Details Texturz Plate; sponge with Soft Suede ink). Adhere to the front of the card base.
Real Red (2-1/4" x 3-1/4"); use corner rounder punch on four corners
Bashful Blue (2-1/8" x 3-1/8"); use corner rounder punch on four corners
Watercolor Paper (2" x 3"); use corner rounder punch on four corners

1. Stamp cupcakes using Black Stazon ink. Use Real Red, Bashful Blue, and Close to Cocoa Watercolor Wonder Crayons with Aqua Painter to color in cupcakes. Paint on White Shimmer Paint (116854) for frosting. Add crystal effects on cherries; let dry.

2. Adhere the stamped and colored watercolored layer to Bashful Blue, then adhere to Real Red layer. Use dimensionals to adhere to the Soft Suede Two Tag die.

3. Thread a length of Real Red 1/2" Striped Grograin ribbon through the Jumbo Eyelet. Gather up the ribbon close to the top of the tag and tie with a piece of linen thread.

4. Attach the Two Tag Die to the front of the card base using dimensionals.

Saturday, March 27, 2010

Miscellaneous Cards!

GHIRADELLI CHOCOLATE HOLDERS:

These two Ghiradelli Chocolate Holders are very similar; the measurements are exactly the same, but they are decorated differently. The first one is one I designed for a workshop in fall colors.

The leaf stamp is from the FALLING LEAVES stamp set and is stamped in More Mustard on Whisper White cardstock. It was punched out with the 1-1/4 inch circle punch. We used the 1-3/8 inch circle punch to punch out Old Olive, then punch out a scallop circle from Ruby Red cardstock. These were all adhered together, and attached to the front with dimensionals. The base of the Ghiradelli holder was made from Soft Suede, the patterned paper was from the Autumn Traditions Designer Series Paper, mounted on Old Olive cardstock. We used the Scallop Edge Punch to make the bottom scallop from Ruby Red cardstock. Two Old Olive brads were added at the top.

The base is 2-3/4" x 8-1/2", scored at 2", 2-3/8", 5-3/8" and 5-3/4" (you can cut four bases from one sheet of 8-1/2 x 11 cardstock. Use the Word Window Punch to punch a slot on the 2" square. Adhere the little piece of cardstock above the slot to the inside of the candy cover using the Sticky Tape. The Ghiradelli chocolate square can be inserted into the slot made with the Word Window punch.

A velcro dot was used to keep the cover closed.

A tea bag can also be used instead of a chocolate square.

This is the Ghiradelli Chocolate Holder we made at November Play Day:


The dimensions are the same as the one above. The base on this is Soft Suede, the printed paper is from the Christmas Cocoa Specialty Designer Series Paper (Holiday Mini Catalog 2009), and is mounted on Real Red. The circle is made with 1-1/4", 1-3/8" circle punches and the scallop circle punch. The branch was stamped in Soft Suede ink, and uses the stamp from BERRY CHRISTMAS stamp set (Holiday Mini Catalog 2009), and the bird was cut out with the Stampin Up Sizzlits Merry Details (Holiday Mini Catalog 2009) and attached with a dimensional. Two Real Red brads were added at the top, and a Real Red scallop at the bottom was punched with the scallop edge punch.

BIRTHDAY CARD:

I needed a special card for a friend recently, so used my Wings of Friendship stamp set (Level Two Hostess Set) to make the card below.


The base is Bashful Blue cardstock, cut out using the Scallop Square Bigz die and the Big Shot. The next layer is a Certainly Celery folded card, with a triangle folded up and attached with two Bashful Blue brads. The bird is stamped with Certainly Celery onto Whisper White cardstock, then adhered to a Bashful Blue layer. The bird was stamped a second time with Certainly Celery, then again with Melon Mambo, and the bird and two flowers were cut out, sponged around the edges, and adhered with dimensionals. A silver brad (Vintage Brads) was added to the center of the green flower.

I cut out a piece of Whisper White cardstock, used the Round Tab punch to punch a label from Bashful Blue, stamped FRIEND from the FUNDAMENTAL PHRASES stamp set in Bashful Blue and adhered it to the top. This was inserted into the pocket to be used to write a message.

This card could also be used for a gift card, tea bag, or possibly even a chocolate square!

The stamped image was CASED from a beautiful card I saw on Splitcoast Stampers made by Carolyn Simonsen which she called Bashful Bird.

SWAP CARDS:

My friend, Ellen Pruett, hosted a fold swap which I participated in. I got back a bunch of totally wonderful cards that I was really WOWED with. These are the cards I made for the swap:

This card uses the gate fold. I used Whisper White, Brocade Blue, and Real Red cardstock to make the card. The snowman image was stamped twice, then I cut out the snowman and used dimensionals to adhere him to the first image. Markers (Real Red, Black and Pumpkin Pie) were used to color the features of the snowman.

My second card uses the Z-fold:

I used the SNOW BUDDIES stamp set (Hostess Level Two in the Holiday Mini Catalog, 2009). I used watercolor paper, Bashful Blue and White cardstock. I used an Aqua Painter and Watercolor Wonder crayons to color the snowman's features (Bashful Blue, Certainly Celery, Pumpkin Pie), and used a bit of Going Gray WW crayon to make a bit of shadow. I used a white gel pen to add dots to the snowflakes in the background, and sponged around the background panels with Bashful Blue ink.

I really liked making the Z-fold card. It was something different that is kind of a surprise when you open it!

Thanks for looking!

Monday, March 22, 2010

Play Day Projects -- December, 2009


This is really, really late, but I have been overcome with computer problems since the first of the year, and before that, well, Christmas busyness overtook me! So, better late than never, I am posting our Play Day Projects for December, 2009, and hopefully will get caught up with blogging some of my other projects as well!

Our first project uses the pillow box die with the Big Shot. The box was cut from Kraft cardstock, stamped with the snowflake stamp from the BERRY CHRISTMAS stamp set (Holiday Mini Catalog). The tag was made from the Embosslits MERRY and Sizzlits MERRY DETAILS (both from the Holiday Mini Catalog). Trees were cut out with Old Olive, Soft Suede, and Always Artichoke cardstock, and Christmas was stamped onto Kraft cardstock with Always Artichoke ink, cut out and adhered to the tag. The Christmas stamp comes from TEENY TINY WISHES. Soft Suede ribbon was tied around the box, and the tag was tied to the ribbon with Linen Thread. Inside the box was a couple of small pieces of candy.

PROJECT TWO:


This project was a gift card holder. We used stamps from the Hostess Level Two set CHRISTMAS PUNCH. The tag was colored with markers (Old Olive and Real Red), stamped onto Whisper White cardstock, and then punched out with an oval punch, and mounted onto Real Red cardstock that was punched with the oval scallop punch. It is attached with dimensionals. The scallop edge punch was used with Real Red cardstock to decorate the front edge, and the gift card holder is held shut with velcro fastener. We tied Real Red grograin ribbon to the top.

PROJECT THREE:

This little candy holder was made with the Two Tag Die and Big Shot. We cut two tags and glued them together, used a Crop-a-dile to add Jumbo Eyelets to the top, and decorated the front with Real Red Cardstock and Christmas Cocoa DS paper. We stamped the snowflake from SEASON OF JOY stamp set in Soft Suede, punched it out with the 1-1/4 inch circle punch, mounted it on Real Red cardstock punched out with the 1-3/8 inch circle punch, and then mounted those on a Soft Suede circle scallop punch that was punched with a paper piercer and mat pack. Some candy kisses were put inside a small cello bag, then we threaded a piece of Real Red striped 1/2 inch grograin ribbon through the eyelets to hold it all in place. Here is a side view picture:


PROJECT FOUR:

Our fourth project is a card using Season of Friendship stamp set. The tree was stamped with Chocolate Chip, the snowflakes were stamped in Brocade Blue, and stamped off to give depth. Bird is Real Red, cut out and mounted with a dimensional. Whisper White was torn and sponged with Brocade Blue to look like snowdrifts. This was mounted to Real Red cardstock, and attached to the Brocade Blue card with dimensionals.

Thanks for looking!

Happy stampin and scrappin, Linda